The instructions below are for the 2004.10.10 standard work station
The 2004.10.10 standard workstation is very nice x86 (Intel-compatible) computer : solid, extremely fast,and reasonably inexpensive.
Some of this instruction ,and most of the pictures,are the specific to the 2004.10.10 standard workstation.If you using any different component,you'll have to figure out appropriate modifications to the instructions.
First:
Unpack the computer case . Discard its plastic warp. Put on an antistatic wrist strap and attach it on to ground (for example, to the screw on a typical light-switch plate).
Unscrew the big screws on the back of the case.Pull on the side latch to open the case.Take the power cord and the brown box out of the case.Open the brown box to find a bag of screws and brass standoff

take five brass standoff out the bag.
Look for four brass standoff already installed
at back of the case:

Two of them are in the line of the bottom ;screw another into the third hole at the bottom. Two more are in the line at the middle; screw another into the third hole at the height. Screw three more into the first, fourth, and the sixth holes on the top,roughly (not exactly) line up with the three standoff on the three stand of in the middle.

use hammer to tap the face plate out of the case :

Open the motherboard box and find the replacement face plate. Tap the replacement face plate into the case, with two holes and three holes at the bottom. The face plate has three tabs bent into the case;bent them further so that they are at 90 degrees to the plate.
take the motherboard of of this box, and lay it on non-metallic flat surface, such as a wooden table:

Look the pattern of the silver-circled holes on the motherboard; those will eventually line up with the brass standoff in the case. Move the brass standoff necessary to match the motherboard.
Unpack the DIMM. Push apart the two white DIMM holders on the ends of the blue DIMM slot on the motherboard.

Push the DIMM solidly into the blue DIMM slot:

Pull the CPU-socket locking lever slightly out, then up to vertical:

Take the CPU out of its plastic container and of the black foam, revealing an array of gold pins:

Put the CPU into the CPU socket, with the CPU triangle on top of the triangle marked on the motherboard; opposite corner from the lever. When the CPU is aligned properly with the socket, it will drop gently into the socket:

Push the CPU-socket locking lever back to its original position:

Take the plastic cover off the heatsink. Put the heatsink on top of the CPU, with the gray square face down on top of the CPU, and with the big black clip toward the center of the motherboard:

Make sure that the big black clip is pointing up, and push the silver hook onto the black tab below it:

Do the same with the silver hook on the other side. Make sure that both hooks are firmly below their tabs. Rotate the big black clip---it will push back at you somewhat---and hook it into place:

Attach the dangling plug into the three pins at the edge of the motherboard labeled ``CPU fan.'' Orient the plug so that its lips hook around the pins:

Lay the case flat on its side. Put the motherboard gently into the case:

Slide the motherboard towards the edge of the case; it will fit snugly into the face plate (under the three tabs that you bent earlier) and the brass standoffs will be visible through the holes. Screw nine small Phillips-head screws into the nine holes. Don't overtighten

 .
.
Unhook the 3.5'' drive cage from the case:


Take the 3.5'' drive cage out of the case:

Plug in the Zalman fan. Plug the fan connector into the fan resistor:

Change the hard drive jumper from CS to Slave. Slide the hard drive into the middle of the 3.5'' drive cage, slightly more than halfway, so that two of its screw holes are visible. Screw the hard drive into the drive cage:

Screw in the other side
Wrap the fan cable around the fan so that it will end up coming out towards the back of the case:

Slide the drive back in to the case,and hook it into place :


slide two drive rails out on the bottom of the case .Screw them onto the DVD-ROM drive:

Change the DVD-ROM jumper from Slave to Master.
Push the top side buttons on the case to release the top front of the case. Take the front off, and pop the middle 5.25'' drive cover out:

(Why the middle position? The top position is bad for two reasons: first, it doesn't give heat from the DVD-ROM drive any room to rise; second, the nice IDE cable won't reach from the hard drive to the top position. In retrospect, the bottom position is even better heat-wise, and makes the cabling less of a stretch, but my pictures assume the middle position.)
Slowly wiggle the corresponding metal plate inside the case back and forth until it snaps off. Watch out for sharp edges.
Slide the DVD-ROM drive into the case from the front until it snaps into place:

Slide the front of the case back on, around the DVD-ROM drive:

If you moved the case, lay it flat again:

Plug the IDE cable into the DVD-ROM drive (master),the hard drive (slave),and the motherboard.


plug the front fan connector into the motherboard:


Don't worry about IEEE 1394 (fire wire) cable.Don't worry about the power-supply fan cable.(I didn't realize, when I was selecting component for the standard workstation , that were only two fan connector on the motherboard..The next version of the standard workstation will have either a $2 3-pin converter or 4-pin case fan.)
Starting now, be very careful not to touch anything inside the case. Power will be flowing into the computer in a moment; if you touch something inside the case, you can electrocute yourself!
Take off the antistatic wrist strap. Turn the case's rear power switch off (0). Plug power into the case. Turn the power switch on (1). Watch the CPU fan, and press the front power button on the case. If the CPU fan doesn't start spinning, turn power off immediately; you have a problem. If the computer doesn't beep within thirty seconds, turn power off; you have a problem. If the CPU fan starts spinning and the computer beeps, turn power off; you have a working computer. Put the side of the case back on.
At this point you can install Windows or linux on the computer.
The 2004.10.10 standard workstation is very nice x86 (Intel-compatible) computer : solid, extremely fast,and reasonably inexpensive.
Some of this instruction ,and most of the pictures,are the specific to the 2004.10.10 standard workstation.If you using any different component,you'll have to figure out appropriate modifications to the instructions.
First:
Unpack the computer case . Discard its plastic warp. Put on an antistatic wrist strap and attach it on to ground (for example, to the screw on a typical light-switch plate).
Unscrew the big screws on the back of the case.Pull on the side latch to open the case.Take the power cord and the brown box out of the case.Open the brown box to find a bag of screws and brass standoff

take five brass standoff out the bag.
Look for four brass standoff already installed
at back of the case:

Two of them are in the line of the bottom ;screw another into the third hole at the bottom. Two more are in the line at the middle; screw another into the third hole at the height. Screw three more into the first, fourth, and the sixth holes on the top,roughly (not exactly) line up with the three standoff on the three stand of in the middle.

use hammer to tap the face plate out of the case :

Open the motherboard box and find the replacement face plate. Tap the replacement face plate into the case, with two holes and three holes at the bottom. The face plate has three tabs bent into the case;bent them further so that they are at 90 degrees to the plate.
take the motherboard of of this box, and lay it on non-metallic flat surface, such as a wooden table:

Look the pattern of the silver-circled holes on the motherboard; those will eventually line up with the brass standoff in the case. Move the brass standoff necessary to match the motherboard.
Unpack the DIMM. Push apart the two white DIMM holders on the ends of the blue DIMM slot on the motherboard.

Push the DIMM solidly into the blue DIMM slot:

Pull the CPU-socket locking lever slightly out, then up to vertical:

Take the CPU out of its plastic container and of the black foam, revealing an array of gold pins:

Put the CPU into the CPU socket, with the CPU triangle on top of the triangle marked on the motherboard; opposite corner from the lever. When the CPU is aligned properly with the socket, it will drop gently into the socket:
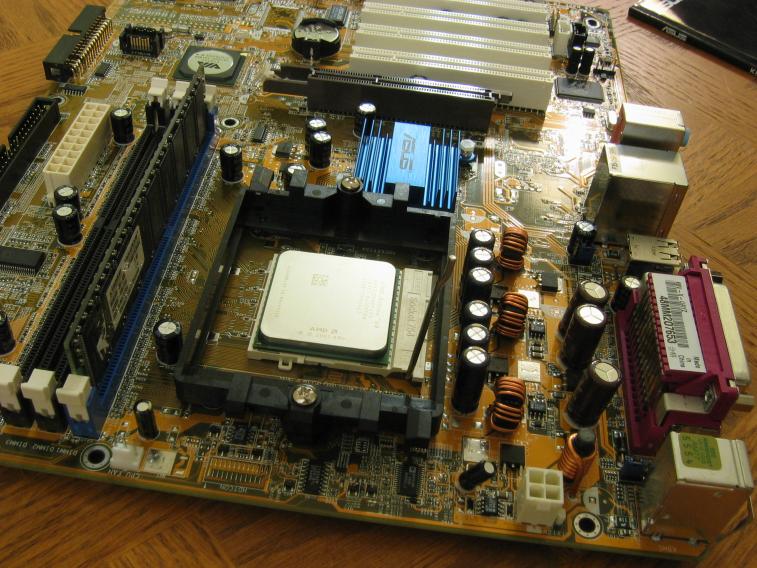
Push the CPU-socket locking lever back to its original position:

Take the plastic cover off the heatsink. Put the heatsink on top of the CPU, with the gray square face down on top of the CPU, and with the big black clip toward the center of the motherboard:

Make sure that the big black clip is pointing up, and push the silver hook onto the black tab below it:

Do the same with the silver hook on the other side. Make sure that both hooks are firmly below their tabs. Rotate the big black clip---it will push back at you somewhat---and hook it into place:

Attach the dangling plug into the three pins at the edge of the motherboard labeled ``CPU fan.'' Orient the plug so that its lips hook around the pins:

Lay the case flat on its side. Put the motherboard gently into the case:
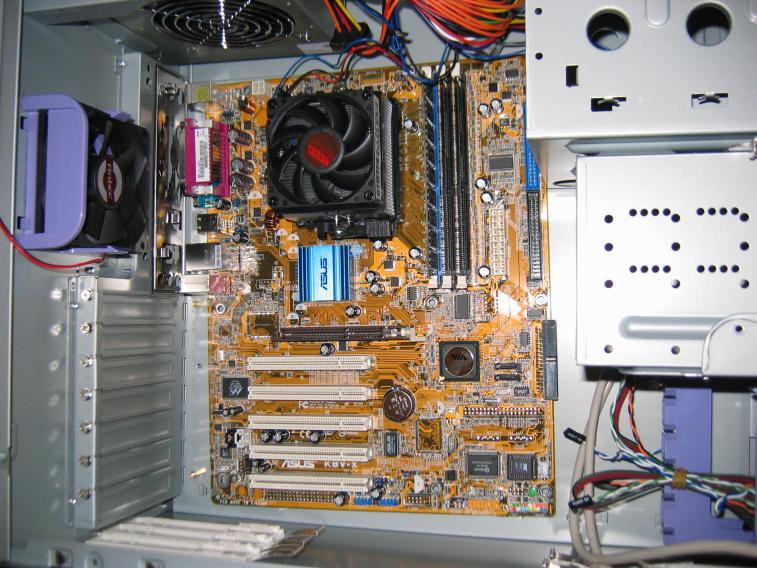
Slide the motherboard towards the edge of the case; it will fit snugly into the face plate (under the three tabs that you bent earlier) and the brass standoffs will be visible through the holes. Screw nine small Phillips-head screws into the nine holes. Don't overtighten


Unhook the 3.5'' drive cage from the case:


Take the 3.5'' drive cage out of the case:

Plug in the Zalman fan. Plug the fan connector into the fan resistor:

Change the hard drive jumper from CS to Slave. Slide the hard drive into the middle of the 3.5'' drive cage, slightly more than halfway, so that two of its screw holes are visible. Screw the hard drive into the drive cage:

Screw in the other side
Wrap the fan cable around the fan so that it will end up coming out towards the back of the case:

Slide the drive back in to the case,and hook it into place :


slide two drive rails out on the bottom of the case .Screw them onto the DVD-ROM drive:

Change the DVD-ROM jumper from Slave to Master.
Push the top side buttons on the case to release the top front of the case. Take the front off, and pop the middle 5.25'' drive cover out:

(Why the middle position? The top position is bad for two reasons: first, it doesn't give heat from the DVD-ROM drive any room to rise; second, the nice IDE cable won't reach from the hard drive to the top position. In retrospect, the bottom position is even better heat-wise, and makes the cabling less of a stretch, but my pictures assume the middle position.)
Slowly wiggle the corresponding metal plate inside the case back and forth until it snaps off. Watch out for sharp edges.
Slide the DVD-ROM drive into the case from the front until it snaps into place:

Slide the front of the case back on, around the DVD-ROM drive:

If you moved the case, lay it flat again:


Screw the IDE cable's grounding connector to the case:

Take the rubber band off the power from the power supply:

Two cable's are different: they are have two row of pins.Plug these cable into the motherboard until they click:


Plug the 4-pin power cable's into the rear fan.The DVD-ROM and the hard drive:

Plug the power- switch, reset- switch, HDD-LED,speaker and power-LED connector into the motherboard, all label facing upwards:


Plug the USB cable into the motherboard:


Don't worry about IEEE 1394 (fire wire) cable.Don't worry about the power-supply fan cable.(I didn't realize, when I was selecting component for the standard workstation , that were only two fan connector on the motherboard..The next version of the standard workstation will have either a $2 3-pin converter or 4-pin case fan.)
Starting now, be very careful not to touch anything inside the case. Power will be flowing into the computer in a moment; if you touch something inside the case, you can electrocute yourself!
Take off the antistatic wrist strap. Turn the case's rear power switch off (0). Plug power into the case. Turn the power switch on (1). Watch the CPU fan, and press the front power button on the case. If the CPU fan doesn't start spinning, turn power off immediately; you have a problem. If the computer doesn't beep within thirty seconds, turn power off; you have a problem. If the CPU fan starts spinning and the computer beeps, turn power off; you have a working computer. Put the side of the case back on.
At this point you can install Windows or linux on the computer.
Hello friend ...
ReplyDeletecan i use that images for a book ?
if you say yes then i will use that images.. and information